These crayon rubbings work great for projects that require multiple images of the same kind and can be useful in teaching Pop Art. For preparation, you will need to make your own stencils, one can be shared among two students. I made a set of 16 stencils for my 32 students. To do so, you need to draw an image with pencil on a 4.5” x 6” photo paper, shiny side up. I used this size because I was teaching Pop Art and needed four rubbings to fit on a 9” x 12” sheet of paper. Once you have traced your image with pencil, trace it again with glue over the pencil marks and let it dry over night. If the glue warps up the paper, you can place small heavy items to hold it down as flat as possible making sure that these items do not touch the wet glue. This will allow the glue to dry as evenly as possible with a notable relief. Once dried, the result will be ready to be used as a crayon rubbing. Aside from your stencils, you will also need to cut out many white pieces of paper that are the same size as your stencil. I used four per student.
Procedure:
1. Have students place their stencil on their desk and tape a same size white paper on top. Have them put a small piece of masking tape on each corner so that the image doesn’t move once they start rubbing.
2. Use a crayon flat on the surface and rub over the entire area. Make sure students are holding their crayon sideways, completely flat on the paper. Rub up and down, and side to side until the image is clearly visible.
3. Remove the tape and repeat the process to create multiple images.
4. Once students have the desired amount of crayon rubbings, they can proceed to painting each one with watercolors. (You can try metallic watercolors and metallic crayons to enhance this project.)
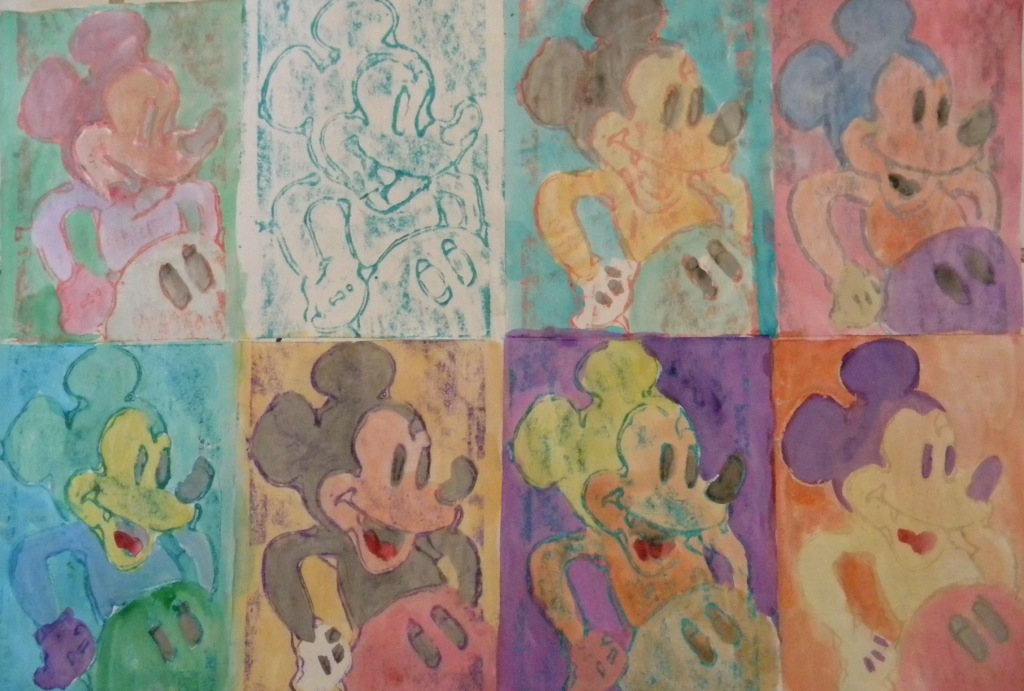
5. Mount your images on a larger sheet of paper of your choice. It is best to adhere the project with diluted glue and a paintbrush so that the glue marks will not show once the glue dries up. My sample above shows eight rubbings on a 12” x 18” sheet.
Materials:
Stencils, including same size pieces of paper, masking tape, peeled crayons, watercolor paints, water cups, paintbrushes, mounting paper, watered down glue and washcloths to keep area clean
Procedure:
1. Have students place their stencil on their desk and tape a same size white paper on top. Have them put a small piece of masking tape on each corner so that the image doesn’t move once they start rubbing.
2. Use a crayon flat on the surface and rub over the entire area. Make sure students are holding their crayon sideways, completely flat on the paper. Rub up and down, and side to side until the image is clearly visible.
3. Remove the tape and repeat the process to create multiple images.
4. Once students have the desired amount of crayon rubbings, they can proceed to painting each one with watercolors. (You can try metallic watercolors and metallic crayons to enhance this project.)
5. Mount your images on a larger sheet of paper of your choice. It is best to adhere the project with diluted glue and a paintbrush so that the glue marks will not show once the glue dries up. My sample above shows eight rubbings on a 12” x 18” sheet.
Materials:
Stencils, including same size pieces of paper, masking tape, peeled crayons, watercolor paints, water cups, paintbrushes, mounting paper, watered down glue and washcloths to keep area clean
